Welcome to our another latest How to Start a Blog guide.
Hope you are excited to read it!
Starting a blog is not hard at ALL!!!
Isn’t that Great!
This article is all about how one can I start a blog with great design and with all the things you’ll need.
So, before we learn the easiest way to make a blog in just 5 simple steps.
I would like to inform you that you are on the right track as digital marketing is booming and millions of people are using internet it is a good chance to share your thoughts online.
Table of Contents
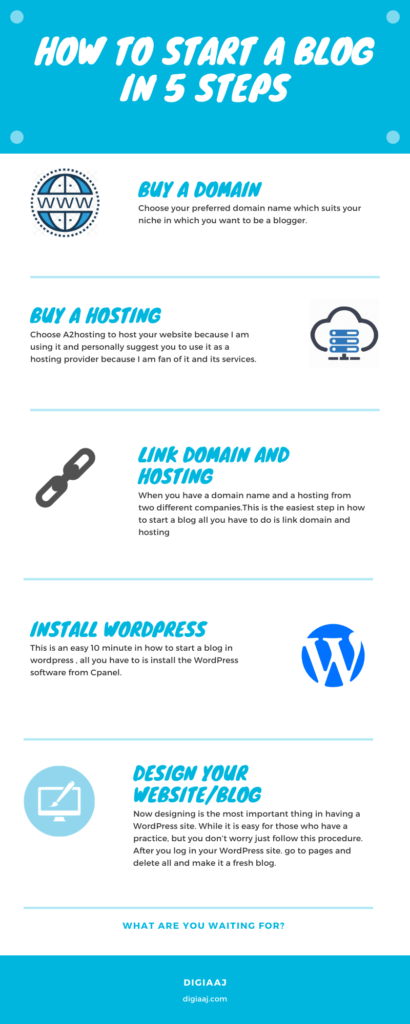
5 Easy Steps to Start a Blog:
Let’s have an overview on how to start a blog step by step with a complete guide
- Buy a domain
- Buy a hosting
- Link domain and hosting
- Install WordPress
- Design your WordPress Site
In this article, you will have a complete understanding on how to start a blog step by step which will help you tp share your thoughts online through your own blog.
So, let’s start with the steps process.
How to buy a domain - Step- 1 (At Discount)
Choose your preferred domain name which suits your niche in which you want to be a blogger.
You can buy a cheap domain from GoDaddy.
To buy a domain follow the procedure
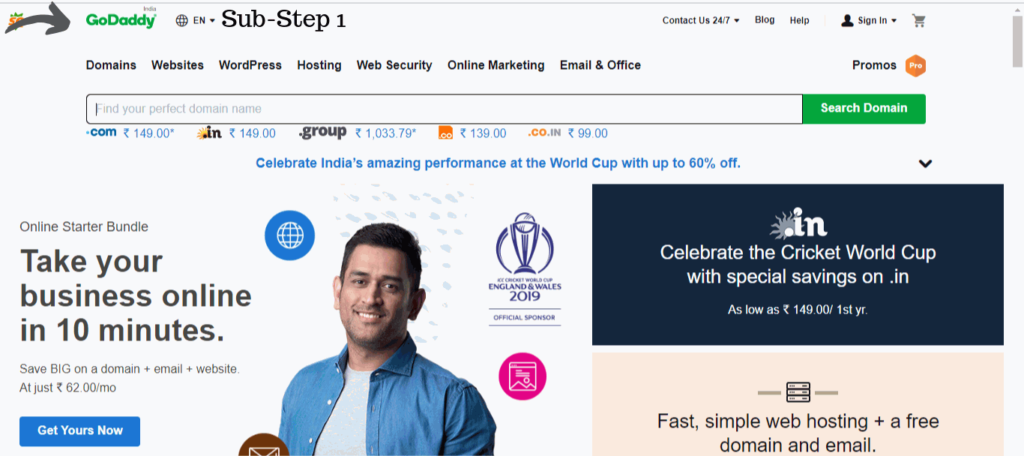
Go to Godaddy.com- (substep 1)
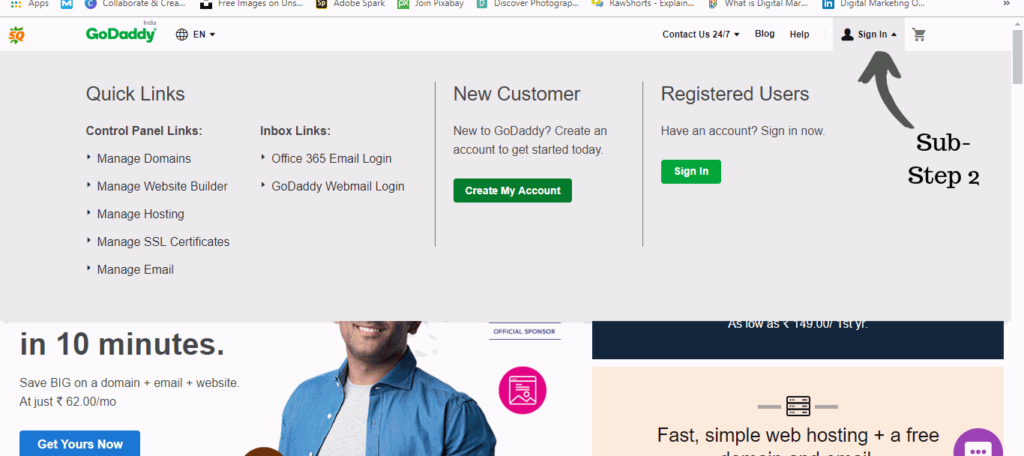
- Click on the sign in button-(substep 2)
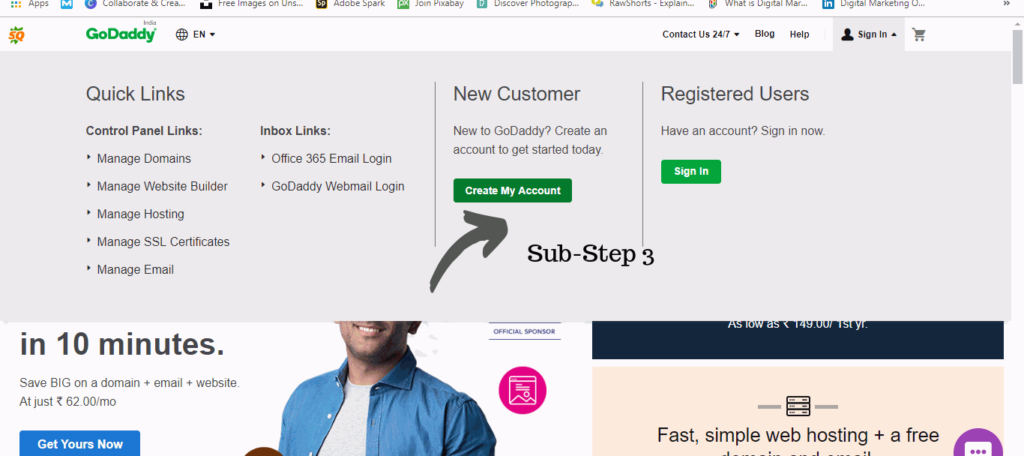
- Then click on the create account- (substep 3)
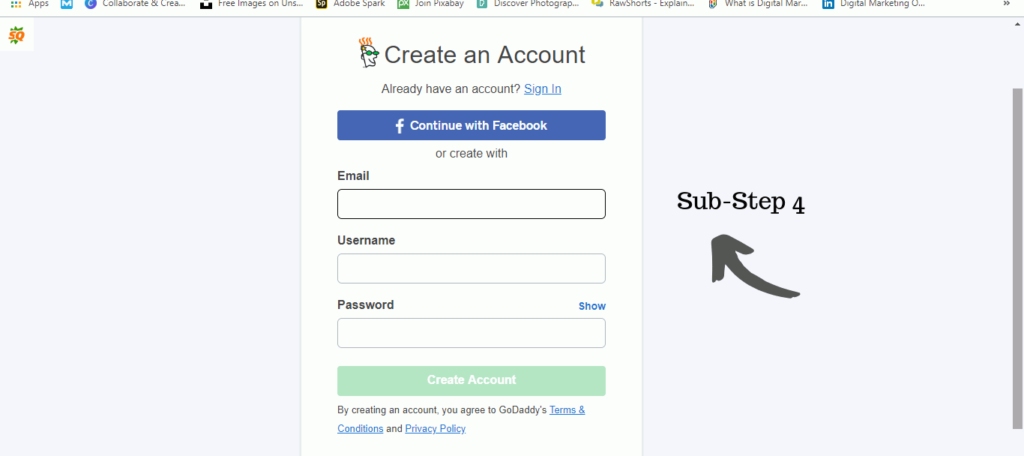
- Create a account in godaddy, fill the email, username and password. (substep 4)
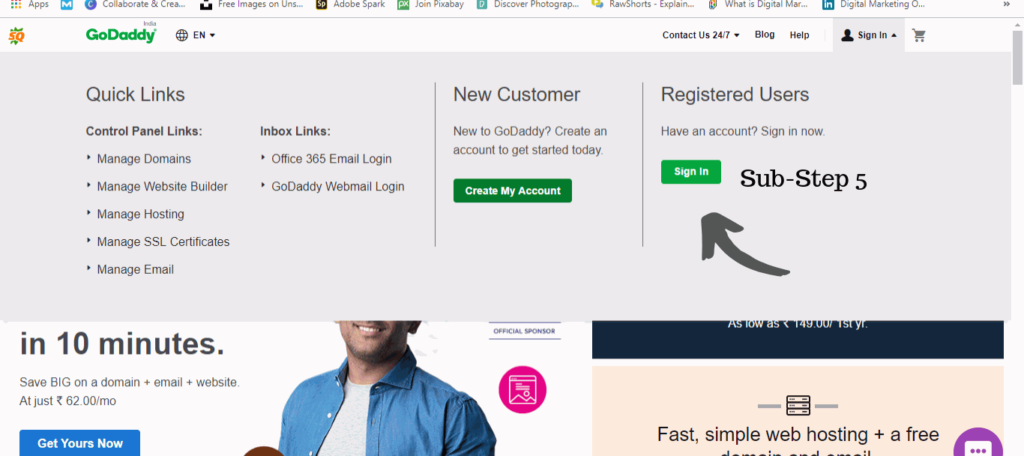
- Now sign in godaddy (substep 5)
Now search for the domain you want in the search bar (substep 6)
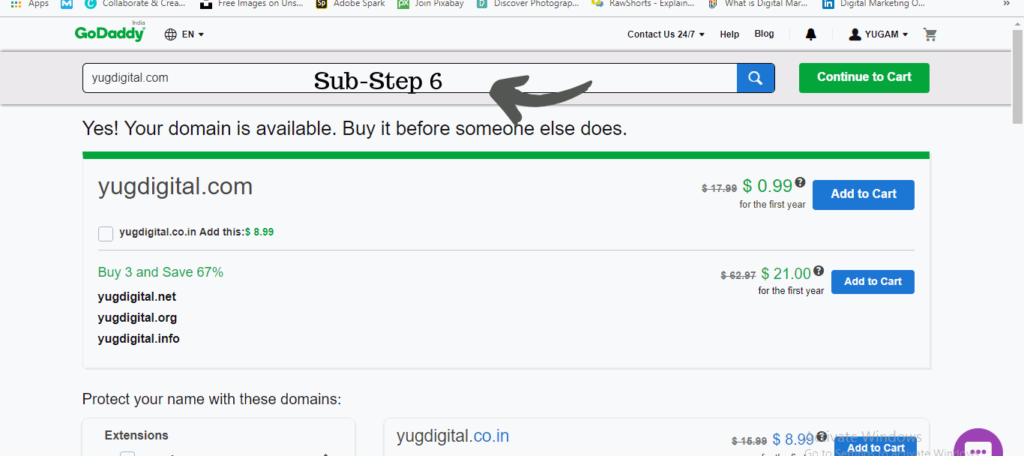
- Always choose .com extention, it is good for bloggers.
- Now click to continue to cart (substep 7)
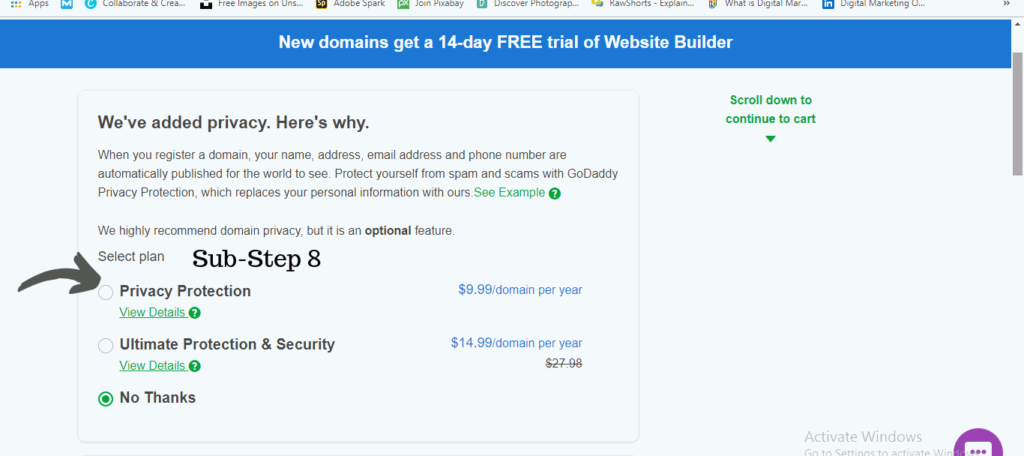
- Uncheck all extra features (substep 8)
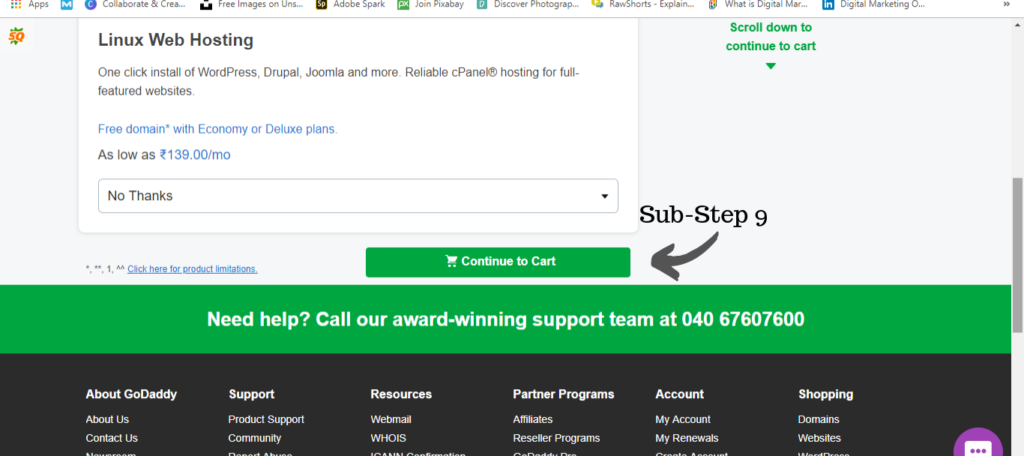
- Then click to continue to cart (substep 9)
- Change the domain registration to 1 year and fill the card details (substep 10)
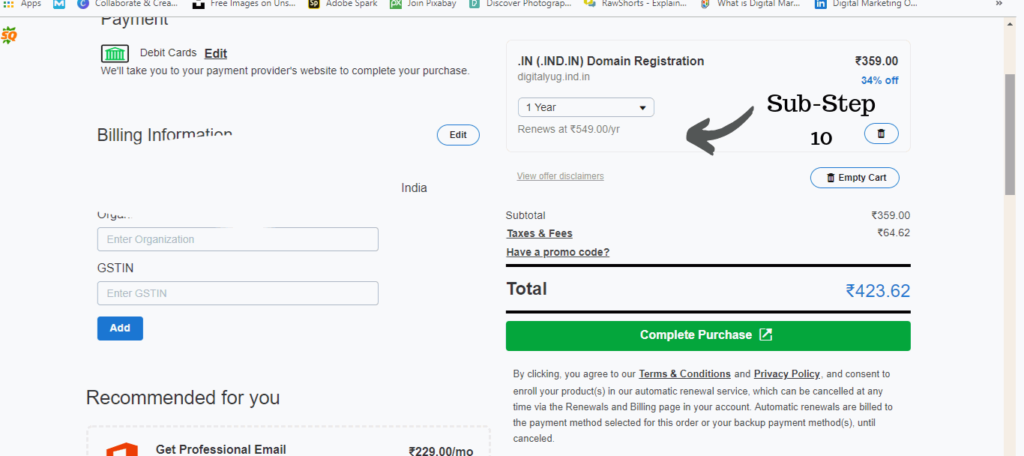
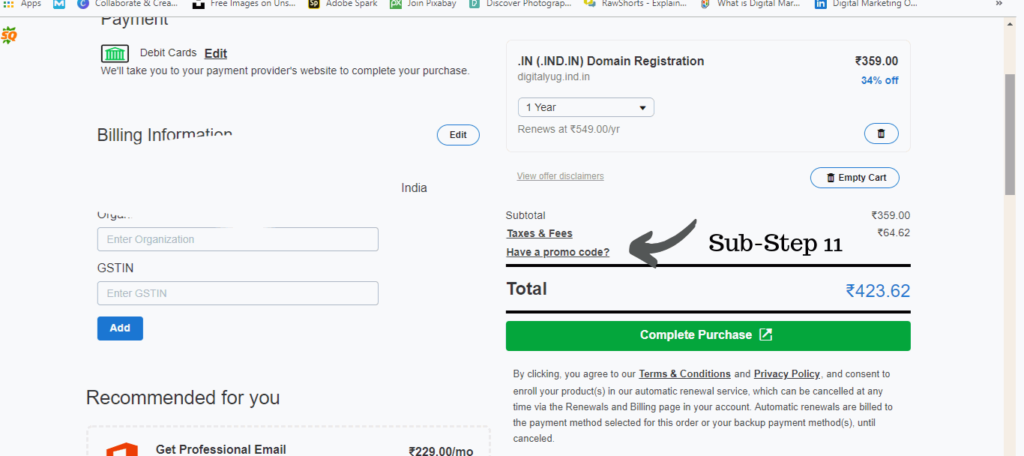
Use promo code (Use code – rpacc19da , cjc99r)
If these codes are not working search on google “godaddy discounts” (substep 11)
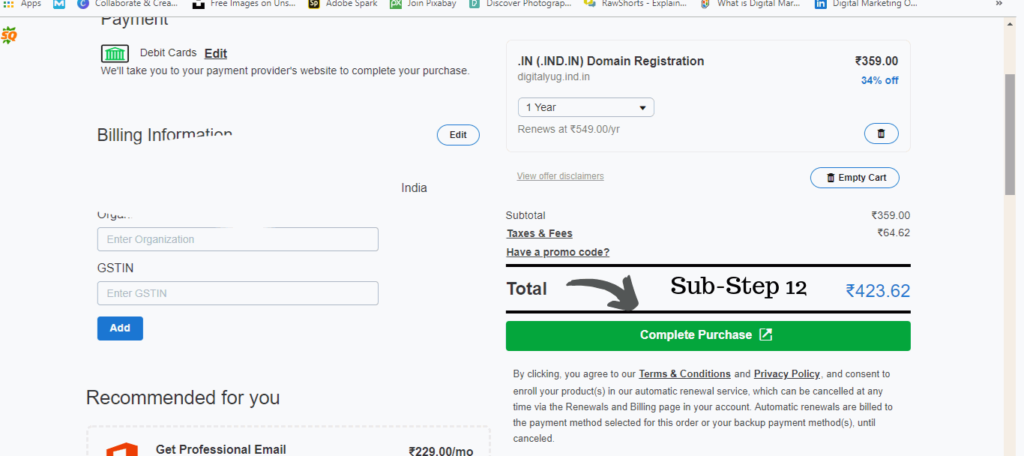
- Then click to complete purchase (substep 12)
Hope you are liking our new article on how to start a blog.
Well, now you question about “how to register a blog online” has started being answering (so read carefully till step – 3), now the next would be to buy a hosting.
How to buy a hosting - Step- 2 (At Discount)
Choose A2hosting to host your website because I am using it and personally suggest you to use it as a hosting provider because I am fan of it and its services.
So our second main step in how to start a blog in 2021 is to buy hosting from the best hosting provider!
Follow the procedure to buy hosting from a2hosting.
Click the link A2hosting
- Go to a2hosting– (sub step 1)
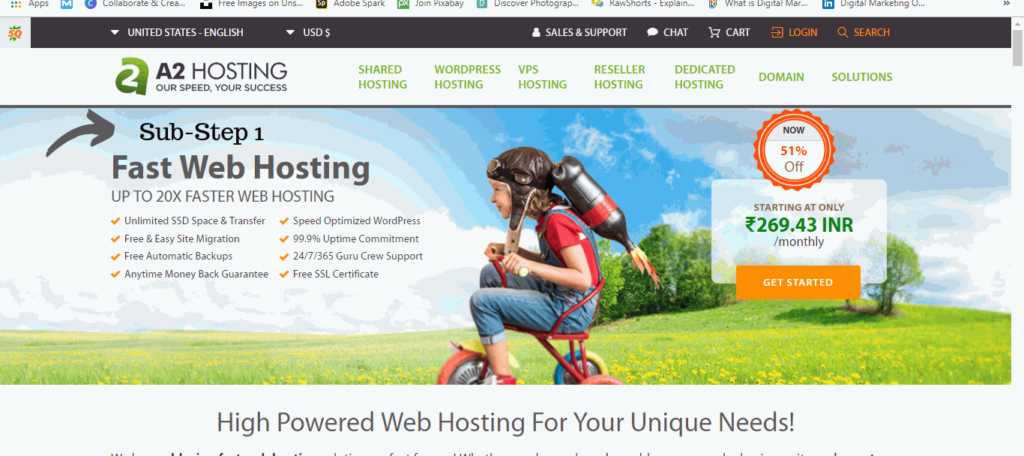
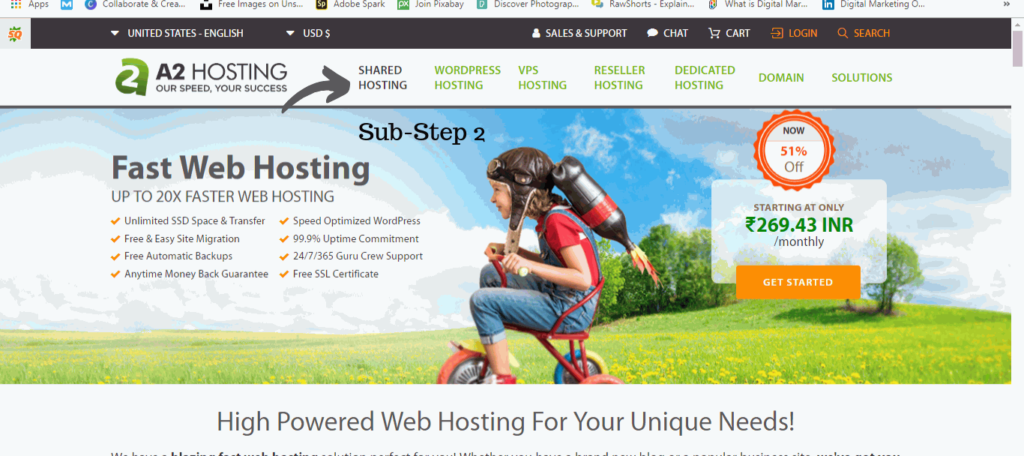
- Click on shared hosting- (sub-step 2)
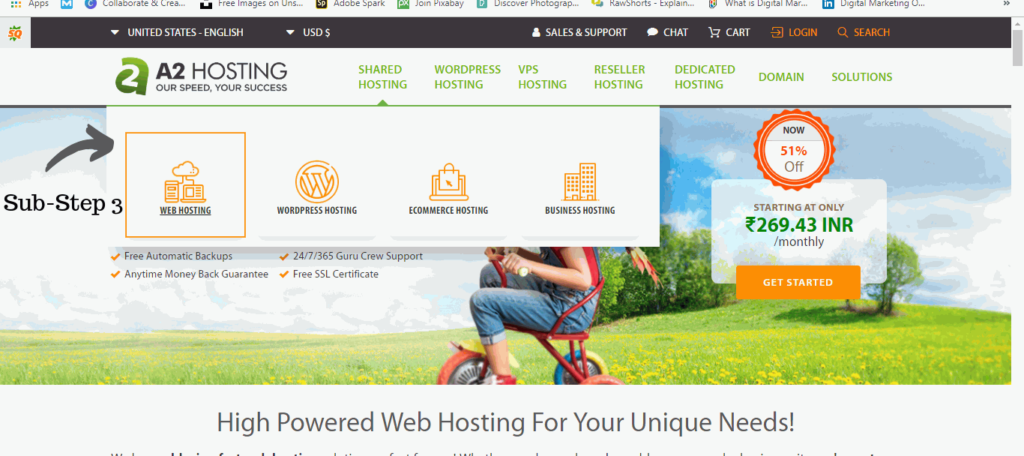
- then on web hosting- (sub step 3)
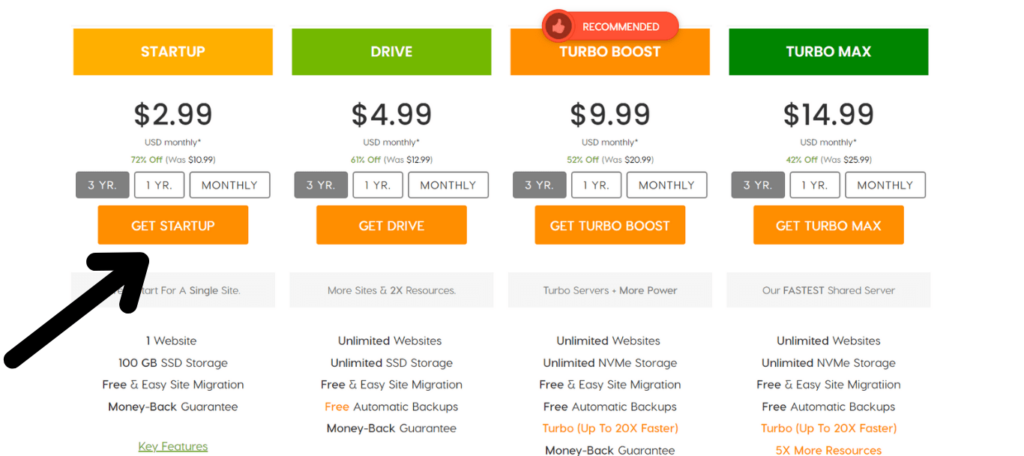
- Choose the startup plan and click on it – (sub step 4)
- Now a screen will come where you have to register a domain but you choose (I will use my existing domain and update my name server) – (sub step 5)
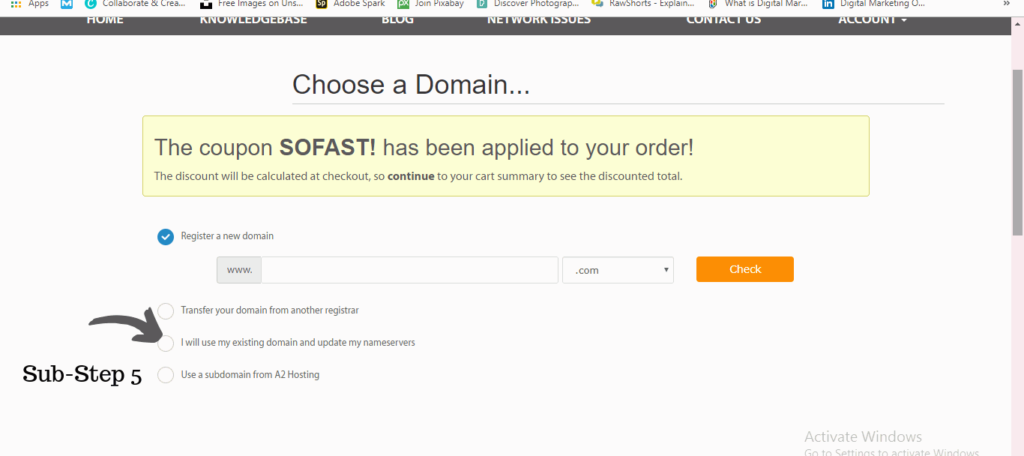
- Submit your domain name and click use. (sub step 5)
- Now a screen will come where you have to make some changes, so start with billing cycle make it 12 months, turbo boost (NO), Dropmy site backups (no backups), Server location (Arizona), a2website builder (None), barracuda spam firewall (None), SSL certificates (Lets Encrypt), Railgun (None), Auto- Install application (None) – (sub step 6)
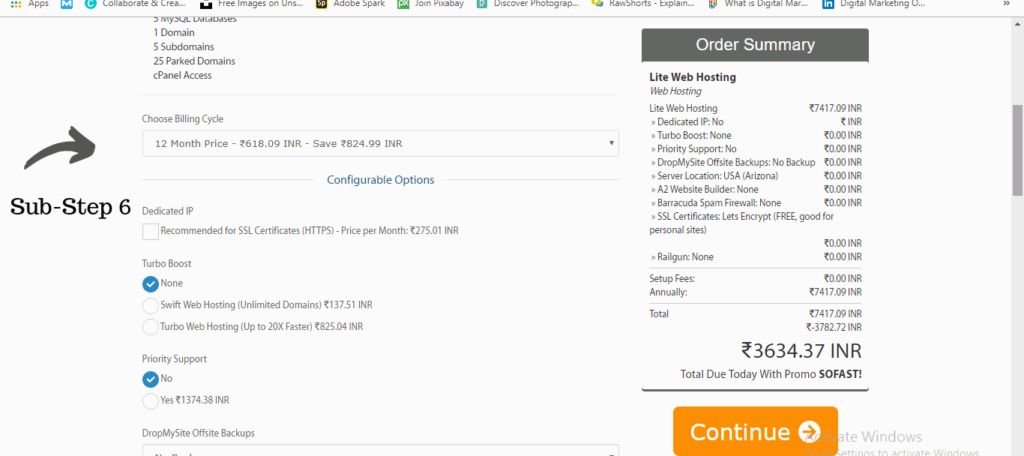
- Now click continue to cart.
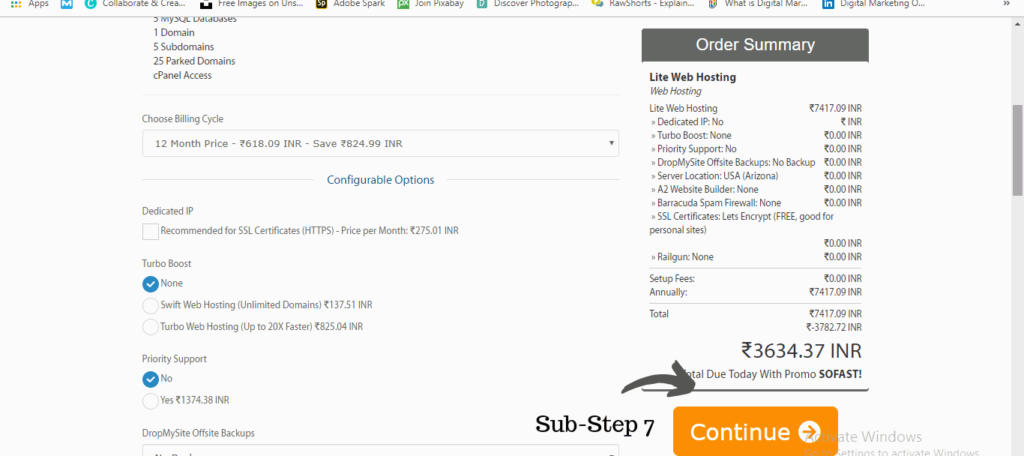
- Now verify that code is used. (sub step 7)
Link Domain name with hosting - Step - 3
- When you have a domain name and a hosting from two different companies.
This is the easiest step in how to start a blog all you have to do is link domain and hosting. Just that! Isn’t it
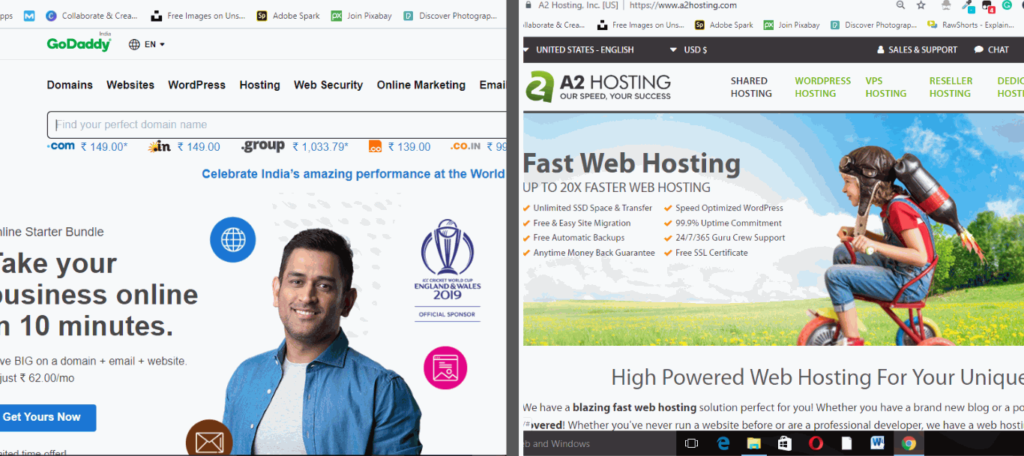
- Then what you have to do is Go to your Godaddy account and find your domain name in it. Go to My products
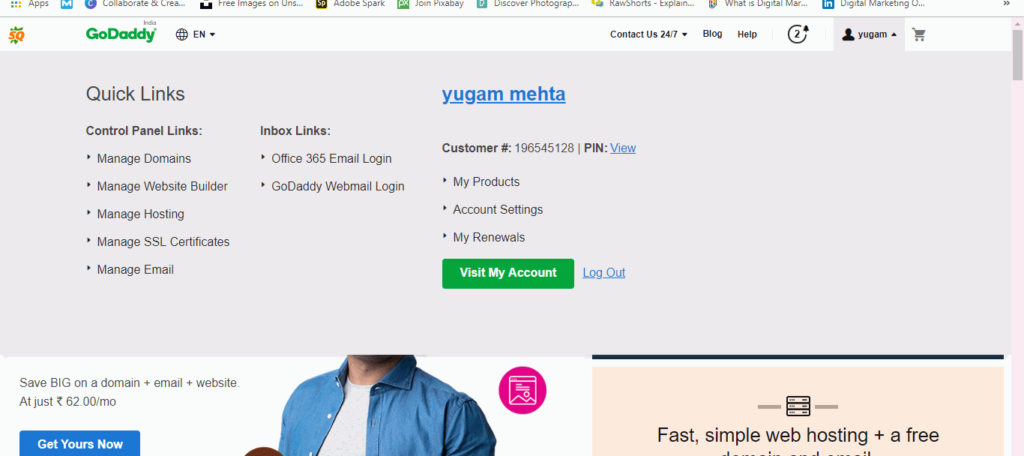
- Once you find the domain name click on the DNS button.
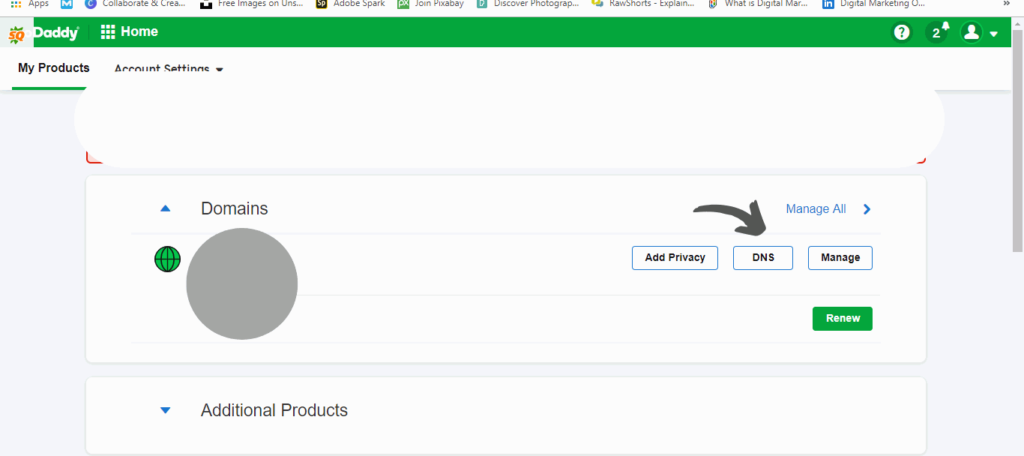
- Scroll down to NAMESERVERS IN DNS
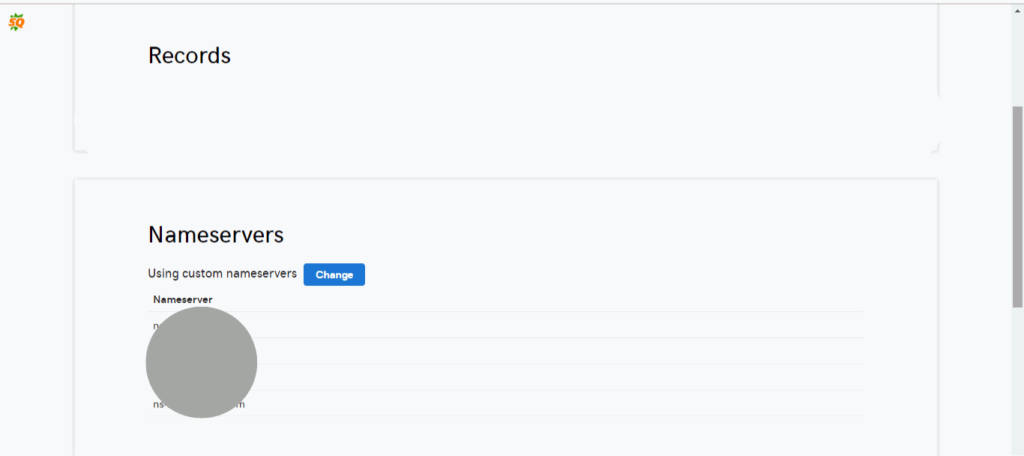
Click on change and select custom
Go to your email which you got from a2hosting after purchasing.
Now again open your Godaddy DNS screen, you can see your nameservers.
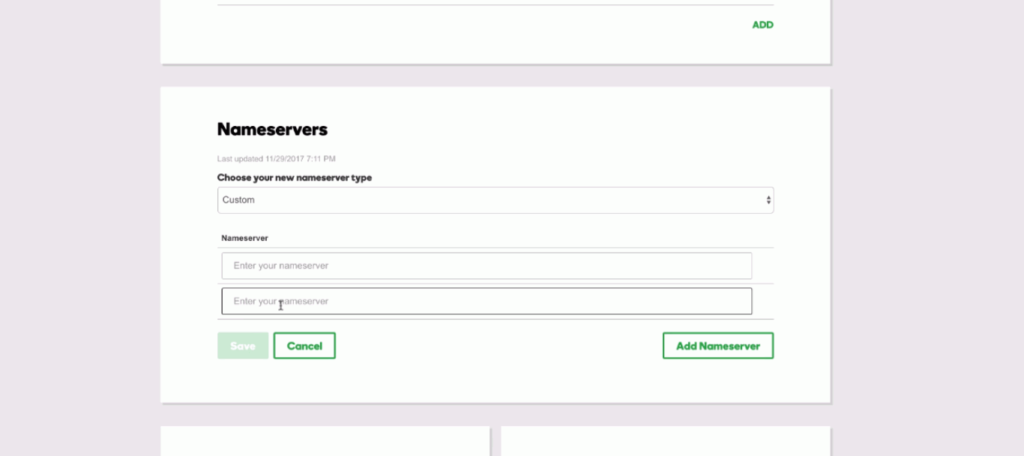
- Select nameserver 1(ns.1) and copy it to the DNS of Godaddy nameserver 1
- Select nameserver 2 and copy it to the DNS of Godaddy nameserver 2
- Select nameserver 3 and copy it to the DNS of Godaddy nameserver 3
- Select nameserver 4 and copy it to the DNS of Godaddy nameserver 4
- Make sure your nameserver match
- Now click save in the nameserver in Godaddy
- You will get a notification that this process might take some time around 24 hours, so don’t be in a hurry.
Well now your doubt about “how to register a blog online” has been solved.
This is the best way to start a blog.
Congratulations now all you have to do is just install WordPress which is a 5 minute process, in how to start a blog.
You have done very well till now, keep it up.
From here you will get a complete knowledge of how to start a WordPress blog step by step.
We will start with installing WordPress, creating pages, categories etc.

Install WordPress - Step 4
Welcome to step by step WordPress blog setup process. This is an easy 10 minute in how to make your own blog, all you have to is install the WordPress software from Cpanel. Follow the procedure.
- What you have to do is login into your a2hosting account
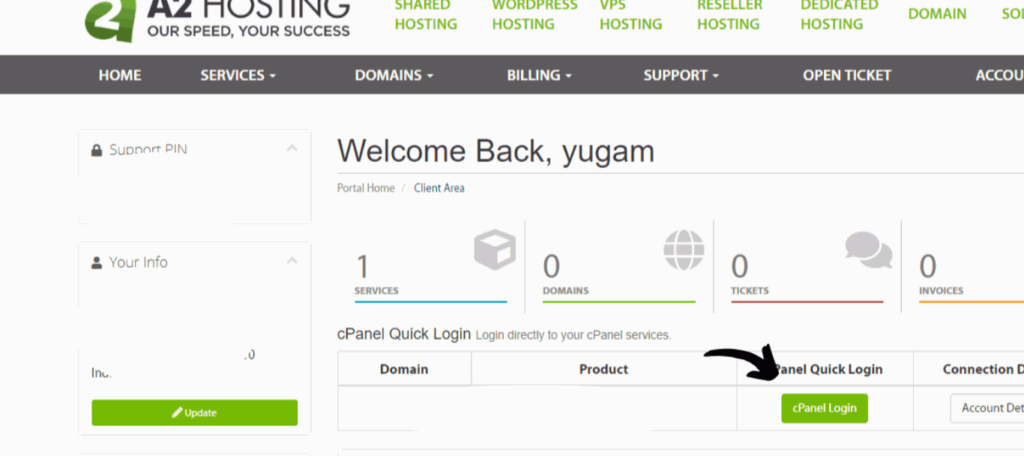
- Go to cpanel login and click on cpanel login button
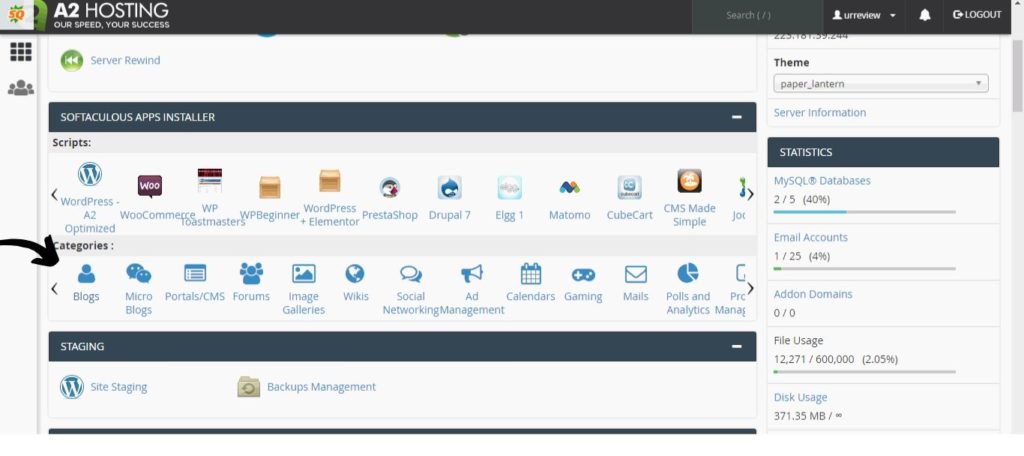
- Now scroll down and find softaculous app installer, and click on blogs button.It will take you one step closer to download wordpress.
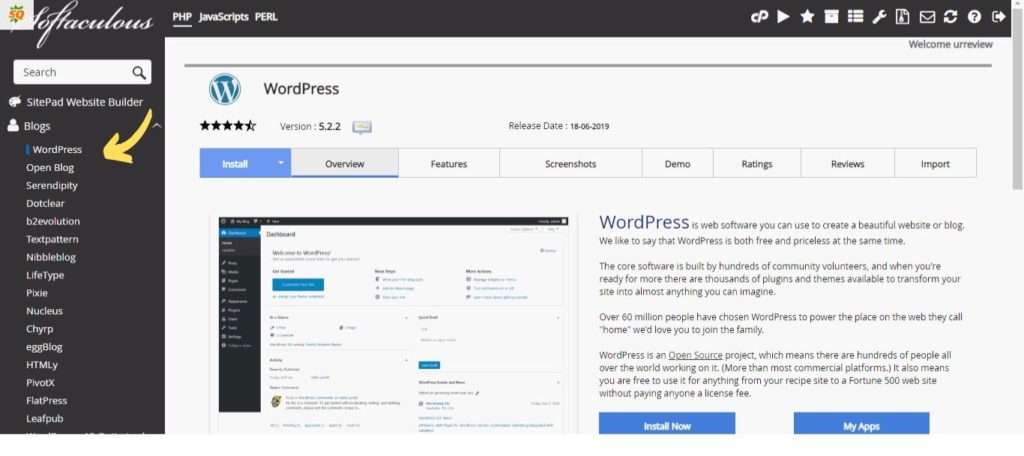
- A screen will appear. Click blog button and then click on WordPress button as shown in the above image.
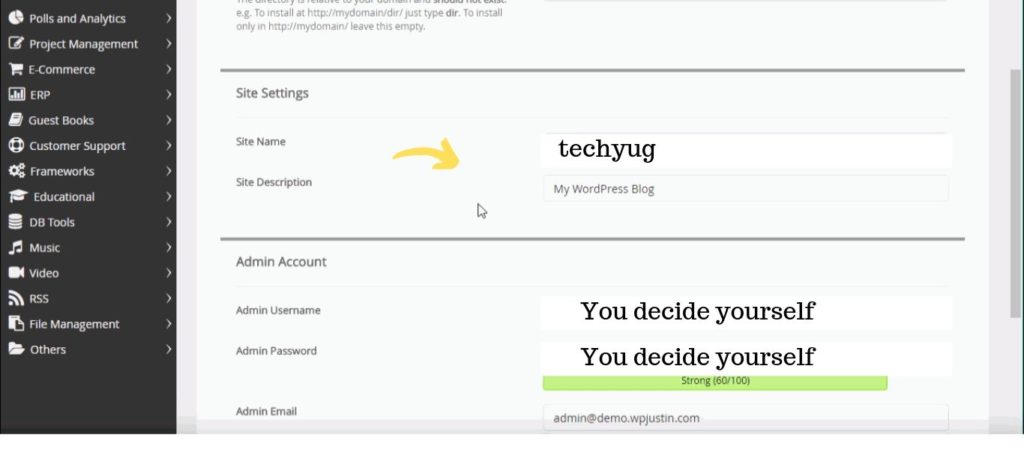
- Now fill the details showing up on your screen like choose protocol (always for https) site name, site description, admin username, admin password, admin email, etc.
- Remember admin username and the admin password is really important so save it somewhere.
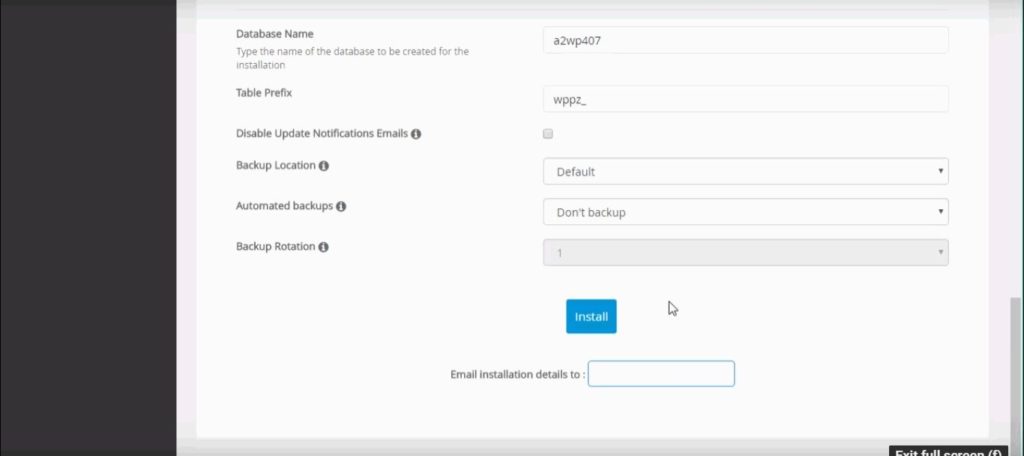
- Now hit the install button.
- Congrats WordPress has installed and you can check your website how it looks
- WordPress admin URL – domain name/wp-admin ( To login your WordPress site use the admin username and admin password)
Design your website - Step 5
Now designing is the most important thing in having a WordPress site.
While it is easy for those who have a practice, but you don’t worry just follow this procedure.
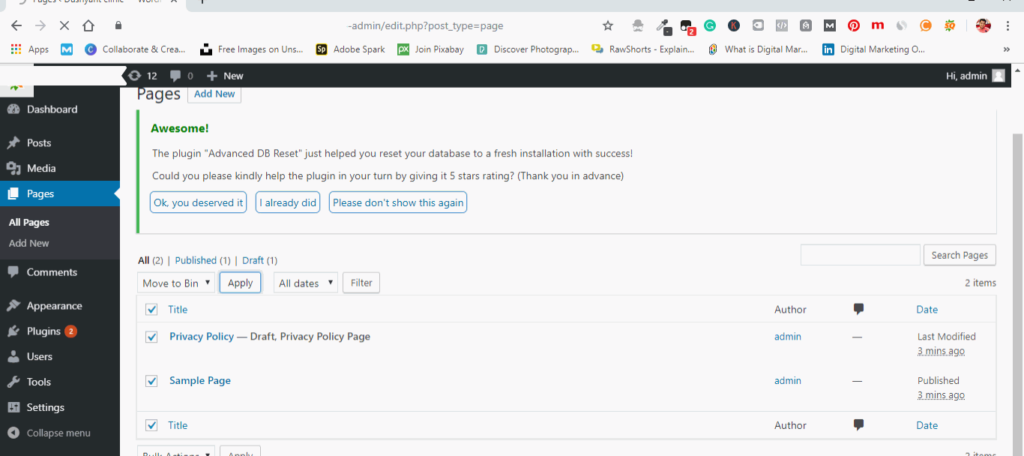
After you log in your WordPress site. go to pages and delete all and make it a fresh blog.
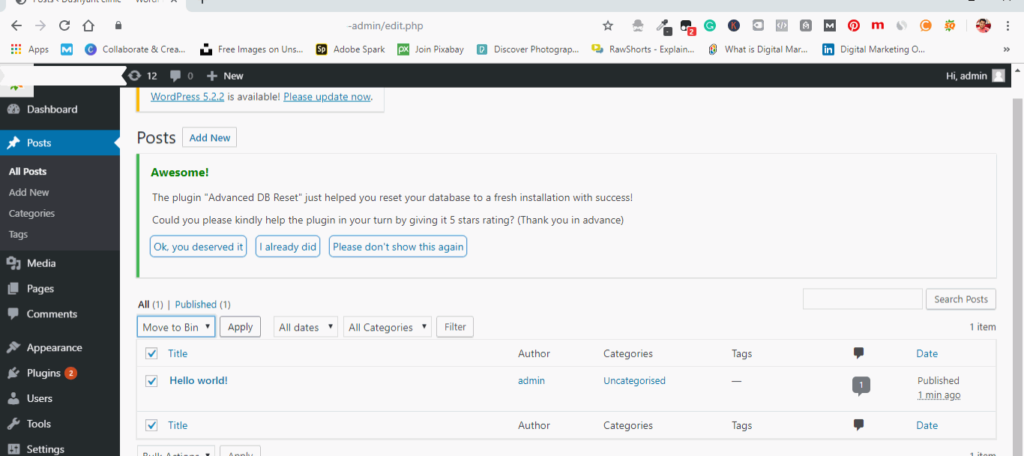
Then go to post, and delete all posts.
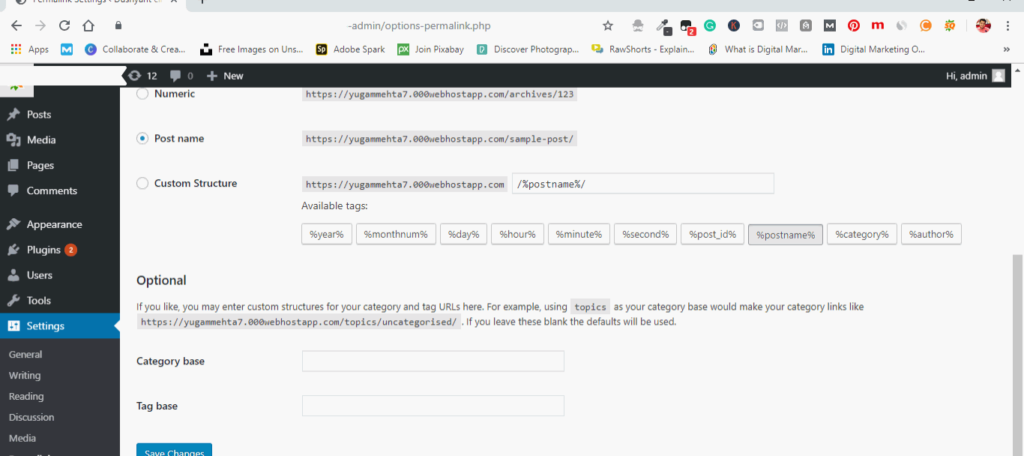
Now go setting and click on permalinks.
Change permalinks to post name.
How to add themes or upload a theme
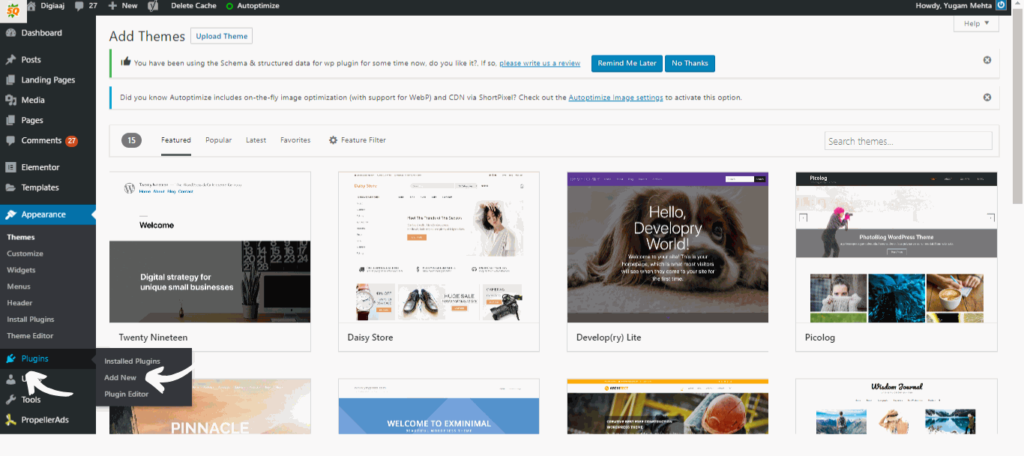
Go to appearance menu and click themes
Add themes
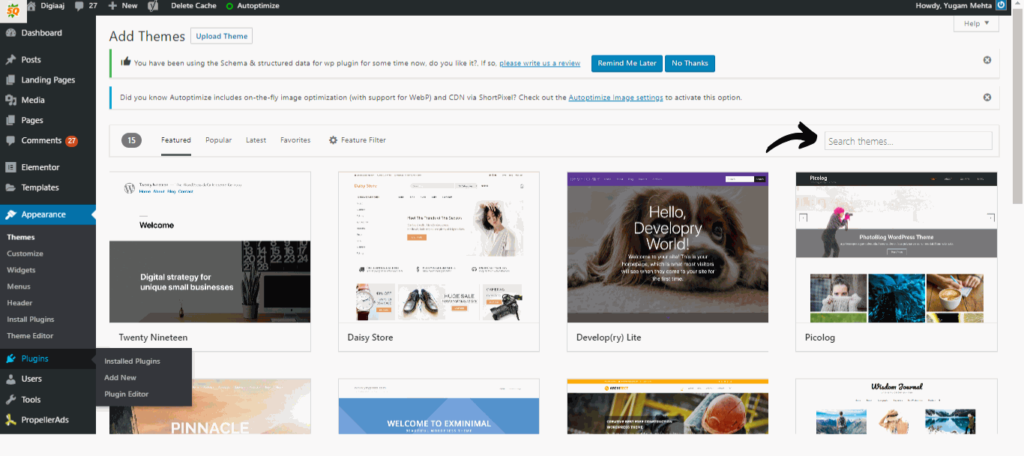
Search for a category like business, blogs, food, etc , it will show you themes related to each category (my personal suggestion go for ocean wp theme, it is fully customizable).
Click install and activate (also remember to download other required plugins needed by the theme like ocean )
How to create a page in WordPress
Go to your WordPress dashboard
Find pages menu click on it and then click add new to add new pages
Enter the title of your page
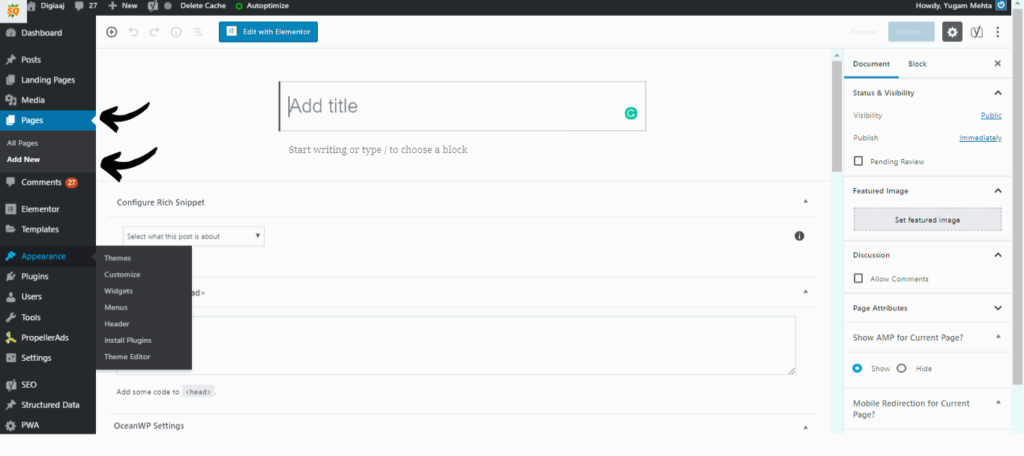
Enter the title of your page
Put content on your page using WordPress editor or elementor (personal suggestion use elementor)
Click publish when you have finished using elementor or WordPress editor.
How to add categories in WordPress
Adding categories is an important part of blogging as you are going to have many different topics to cover an
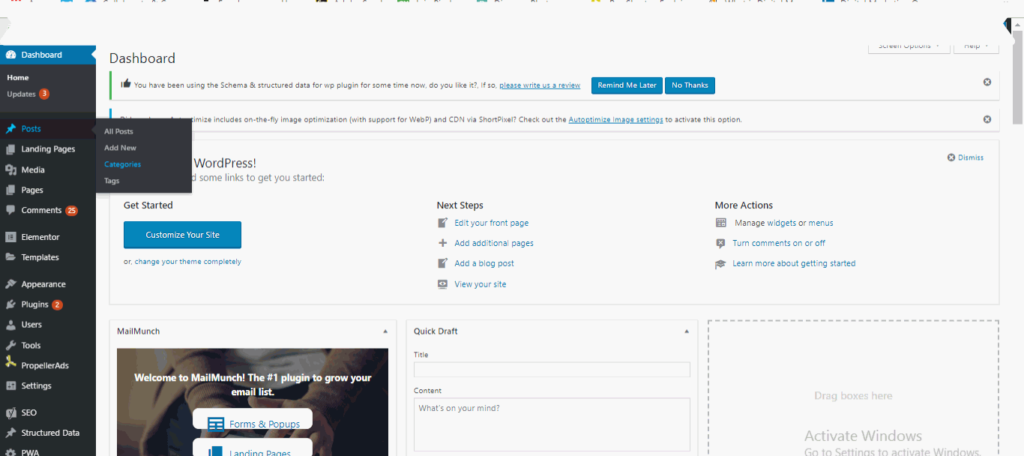
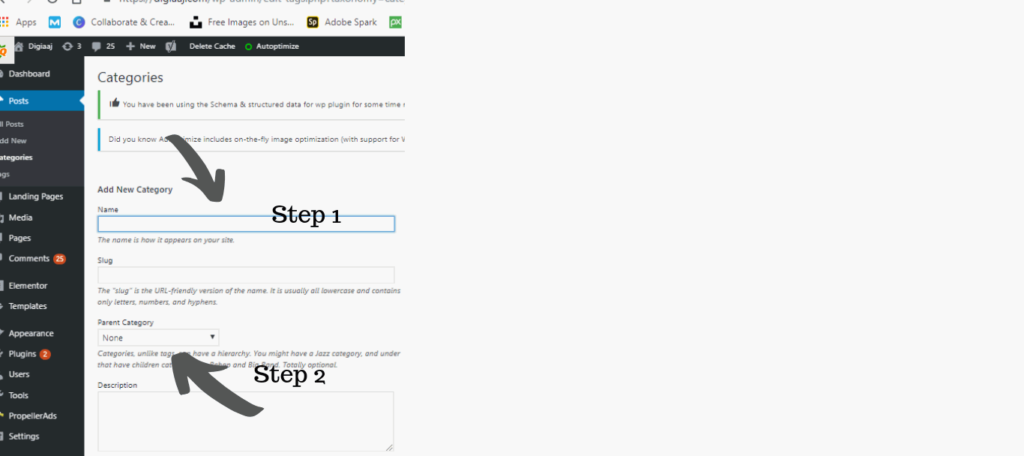
First, go to post button and hover then click on categories, now carefully follow the next step.
Do not add parent category option better to leave it as none if you are creating your parent category.
How to install plugins in WordPress
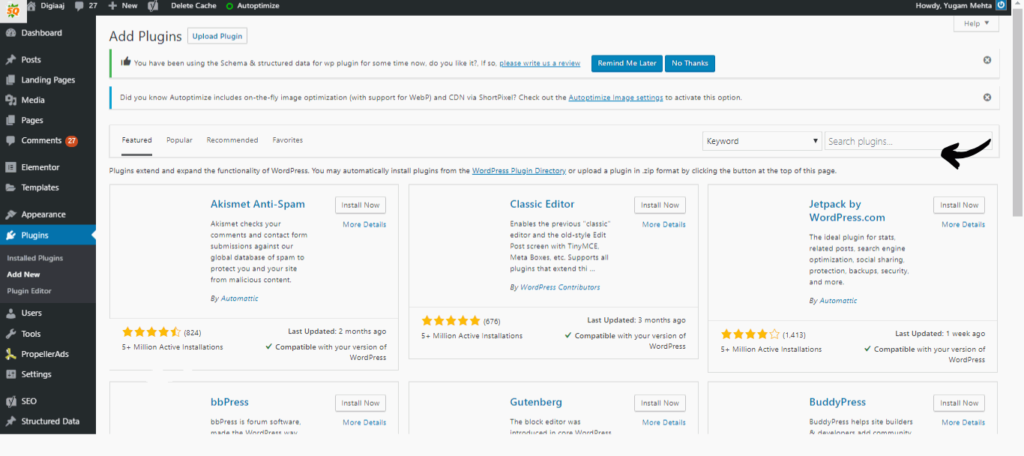
Go to the plugins menu and click it
Click the add button
Search the name of the plugin you want
When you searched that plugin
Click install and activate
Plugins that every blogger needs
- Yoast seo
- Auto optimize
- Elementer
How to create a post in WordPress
- Go to posts menu and click add new
- Add a title to your post
- Select the category in which you want it to see, always remember to select your parent category and subcategory (select subcategory when you have otherwise parent category is good to go with).
- And click edit with elementor (if you are using it otherwise you can use WordPress editor)
- Now drag and drop text editor on the screen.
- Put the content on it.
- Do changes with the text font, color, and size.
- and hit publish.
After that click customize. Now customization will take time to understand. Customization is an important step in this article of how to start a blog, so do not skip this part!
Let us do basic customization.
Go to appearance and click customize button or you can go to your home and click customize button there.
You will see some tabs.
Site Identity
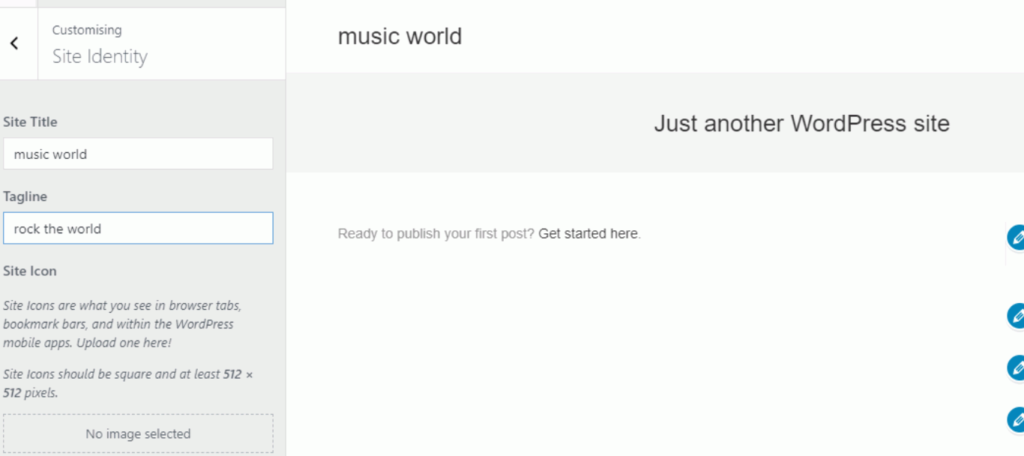
Customization of site identity – When you click site identity button, you can see two things one field is for site name and the other site tagline. Fill both of them.
Menus:
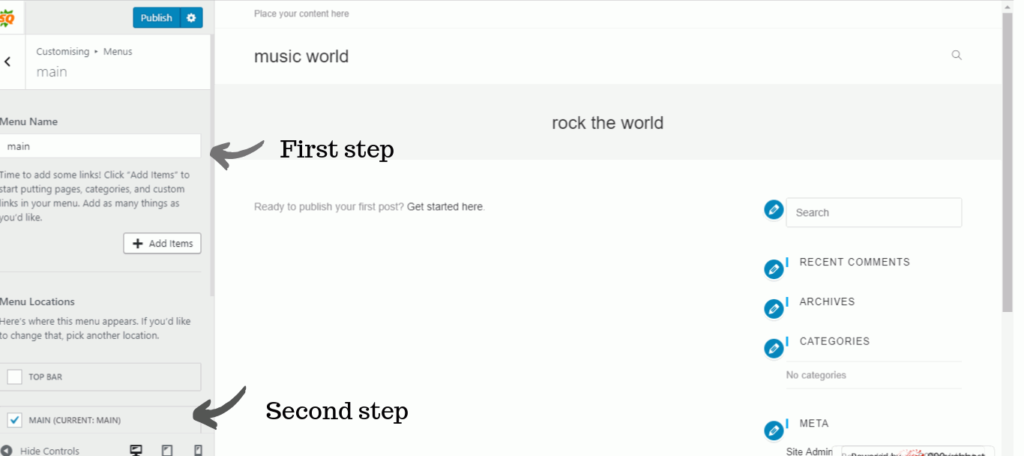
Customization of menu – When you click menus, you have to give a name to the menu (main) would be perfect. Then you have to select menu location select main.
Now you have to add pages that you created earlier and it will be shown in the main menu and click publish.
Widgets:
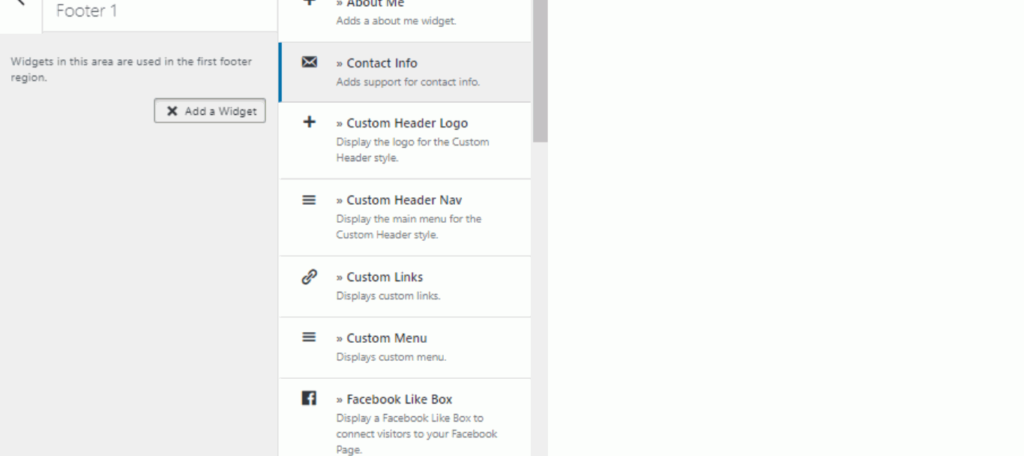
Customization of widgets
Customization of homepage settings:
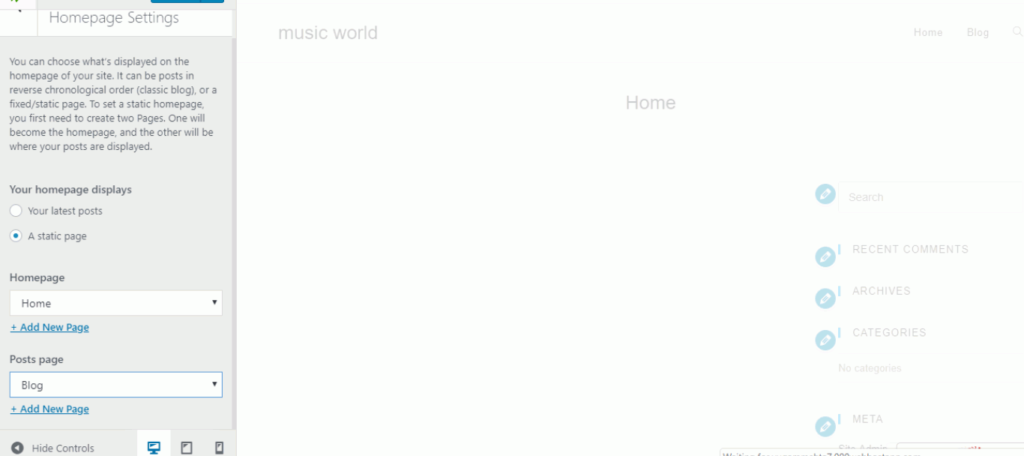
Homepage Settings – When you click homepage settings, you have to click on static page. Select home for homepage and select blog for postpage and click publish. This is really important to do.
General Options – Do not change anything unless required.
Customization of general options
Typography – Do not change there is no need in the beginning.
Top Bar:
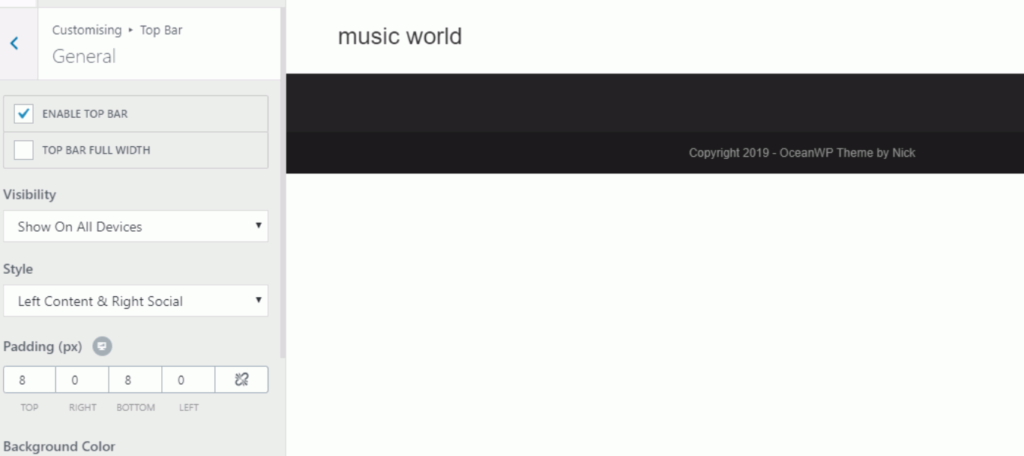
Customization of top bar – When you will click top bar button, you can see top bar button is has a tick which it is enabled you have to disable that and click publish. It is only up-to you what to do want.
Header:
Customization of header –
It has 5 tabs which include general, logo, header media, menu, social menu and mobile menu. This is really important to do.
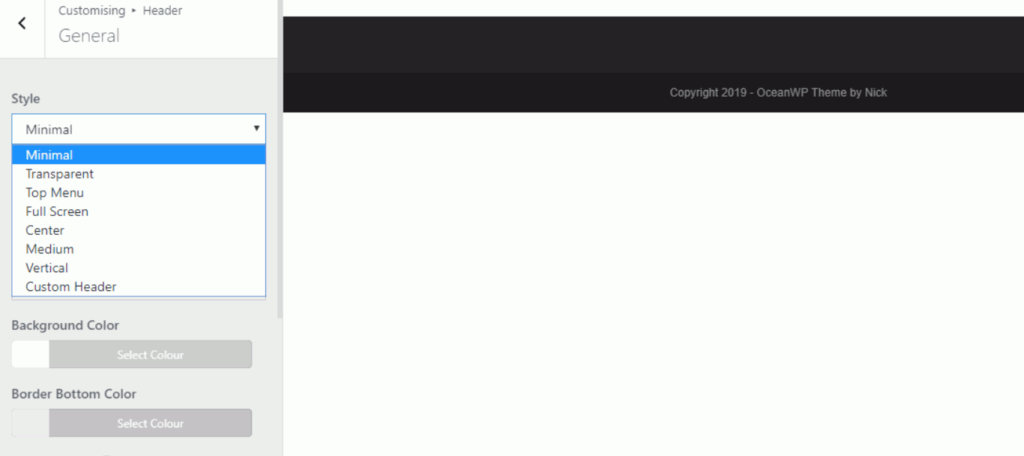
General – In this setting you can change the look of your main menu by selecting out of the seven options, but go for minimal style menu. Also you can change the background color and border bottom color.
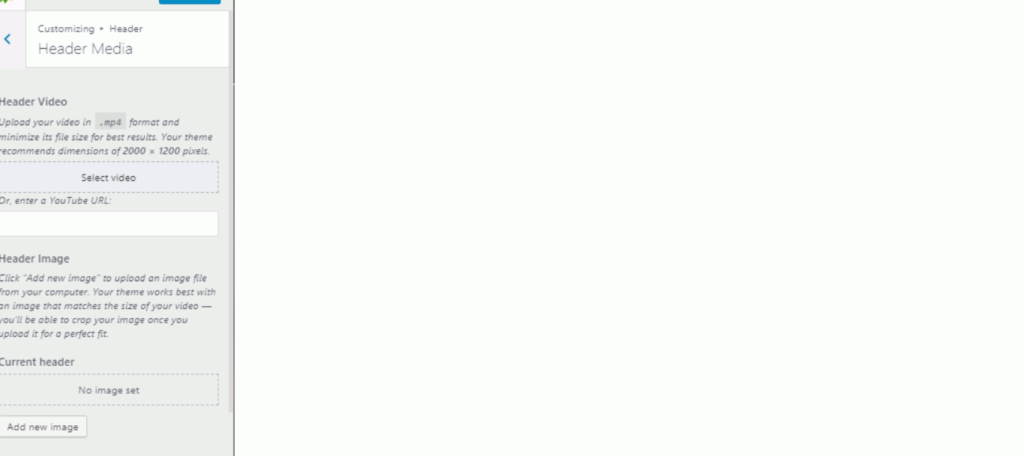
Header Media- In this setting you can either add a video or a header image.
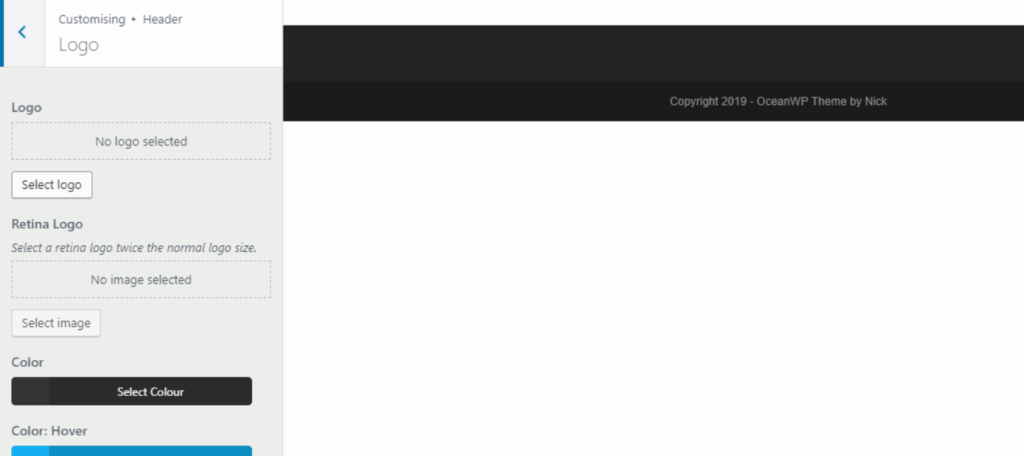
Logo – In this setting you adjust the size of your logo.
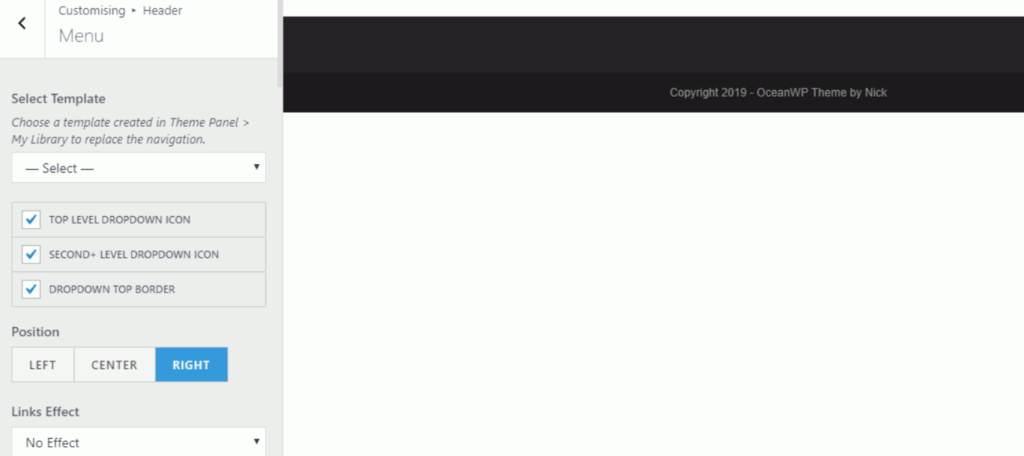
Menu – when you click menu button, you can add links effect, links color in your main menu.
You can change the search icon settings, whether you want search bar or not.
You can also change the settings of your category, it’s dropdown menu
You can change position of your main menu. There are things also you can do here but it will take time to understand, right now go with the basics.
Social menu- In this setting, you can add a social menu to your blog, if you want
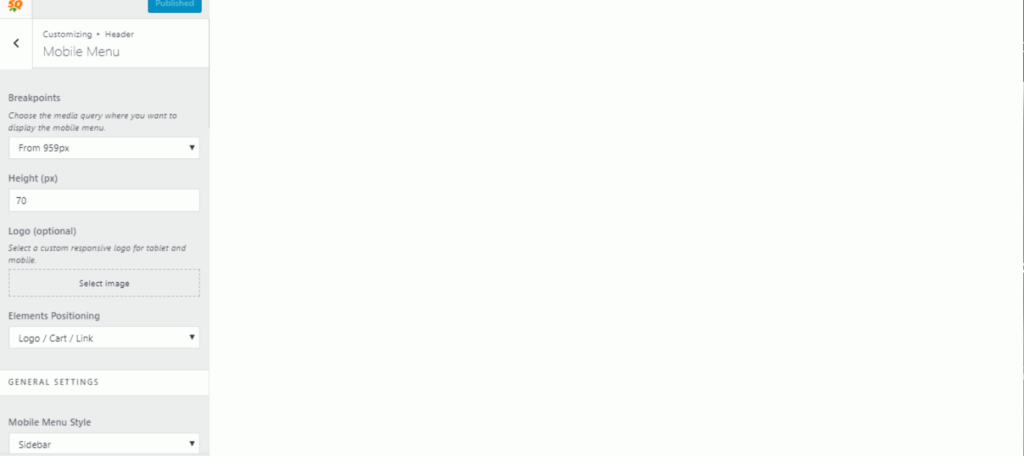
Mobile menu – In this setting you can change how your website will look on mobile devices.
You can change mobile menu drop down, which background color you want.
Blog- Do not change anything it is too earlier.Only if you want to
Sidebar – Up-to you I do not recommend it.
Footer Widgets- Just leave it enable.
Footer Bottom – Disable footer bottom
Custom CSS – Do not touch unless you have technical knowledge.
Now you have successfully a created a blog!
This was our step by step guide to starting a blog, and trust me this is the one and only best way to start a blog with ease.
Hope it had cleared your queries
WordPress.com is a hosting service provided by the same company automatic who created both wordpress.com and wordpress.org.
It is a way of income for them.
1-Wordpress.com will play advertisements on your WordPress site but you won’t get paid for it.
Visitors will see your ads but the profits would not be shared until you upgrade your hosting plan to premium or business or eCommerce.
- The cost of maintaining a wordpress.com website is
3. You will not be able to upload plugins if you are using free, blogger and personal. To upload a plugin, you need to upgrade your hosting plan to premium, business or eCommerce.
- You cannot install themes in your wordpress.com websites if you are using free, blogger and personal hosting plan.
You need to upgrade your hosting to premium, business or eCommerce. - To get unlimited premium themes. You need to upgrade your hosting to premium, business or eCommerce.
- For using Simple payments You need to upgrade your hosting to premium, business or eCommerce.
7. Google analytics integration is only available in premium, business or eCommerce hosting plan.
8. Personalized help is only available in business and eCommerce hosting plan.
9.SEO tools are only available in business and eCommerce hosting plan.
10. Storage space is unlimited in business and eCommerce hosting plan.
WordPress.org, on the other hand, is an open-source software which can be used by anyone.
- Free and easy to use.
- No restriction for adding themes and plugins
- You can do monetization there is no restriction as we can see in wordpress.com
- You can use google analytics tool with no restriction.
- You can run your eCommerce store with less cost.
1. You need a hosting company, where all of your data will be stored.
- You have to update you’re your WordPress software, themes and plugins yourself by logging in to your dashboard.
Though both have the same name WordPress both are two different platforms.
.org- it is an open-source free software when you use hosting providers and install WordPress this is it what you are installing. This is what I recommend.
.com- when you use wordpress.com you are hosting your site on wordpress.com.
There are many restrictions in wordpress.com as compared to .org.
Note: if you are serious about starting blogging use wordpress.org you will not regret it, I assure you that.
Most people will recommend you to go for wordpress.org.
1.Ubersuggest – This free tool can be used for keyword researching. I use this tool for searching new keywords in my niche and has helped a lot in my blogging. Learn how to begin a blog through this article and start using this amazing tool!!
2.Keyword everywhere – This free tool can be used for keyword researching. My recommendation is this tool.
3.Canva- This free tool can be used for graphic designing.
4. Smallseotools – This free tool can be used for
(a) Text Content Tools – It is used for several purposes as follows:
plagiarism rate, article rewriting, word counter,grammar check, text to image converter, image to text converter, spell checker, MD5 generator,uppercase to lowercase, word combiner, translate English to English.
(b) Image Editing Tools – It is used for image optimization purposes.
Image compression, image resize, favicon generator, crop image, reverse image search, video to gif converter, convert to jpg, rgdb to hex
(c) Keyword Tools – It is used for keyword purposes:
keyword position, keyword position, keyword density checker, SEO keyword competition analysis, keyword suggestion tool, keyword research tool, keyword completion tool, related keywords finder, link keyword analyzer, paid keyword finder, long-tail keyword suggestion tool
(d) Backlink Tools: It is used for backlink purposes:
backlink checker, backlink maker, website link count checker, the website is broken link checker, anchor text distribution, valuable backlink checker, link price calculator
(e) Website Management Tools – It is used for website management purposes:
Website SEO score checker,page speed test,google PageRank checker,online ping website tool, XML sitemap generator,minify CSS,minify HTML,minify js
(f) Website Tracking Tools: It is used for:
Page comparison, google cache checker, the code to text ratio, spider simulator
(g) Proxy Tools – It is used to check:
IP Address, IP location, free daily proxy list etc.
(h) Domain Tools – It is used to check and find:
Domain age, domain authority, domain to IP, find DNS records, expired domains.
(i)Meta tags tools
Meta tags analyzer, meta tag generator,
(j) Password Management Tool
Password strength checker, password encryption utility, password generator
(k) Online pdf tools
Merge pdf,pdf to word,word to pdf,pdf to jpg,compress pdf, excel to pdf
(l) Development Tools
JSON to XML, JSON Formatter, JSON Validator
(m) Unit Converter
Time converter, speed converter, pressure conversion
5.Duplichecker -This tool is similar to smallseotools having similar tools.
6. Grammarly –This tool has free as well as the paid version. It corrects your grammar mistakes.
7.Ahrefs –This tool is used for checking you SEO statistics, audit your stats, check your competitors, backlinks, etc.
8.Alexa – This tool is used for competition analysis, website ranking
All of these tools will help you in setting up a blog and is additionally the easiest way to start a blog
How to Start a Blog Infographic
How to Start a Blog FAQs (Frequently Asked Questions) People Also Ask
How can I start blogging as a beginner?
To start a blog as a beginner, follow 5 simple steps:
1- Buy a good domain name.
2- Buy a hosting.
3. Link domain and hosting (only if both are different)
4. Install WordPress
5. Design your website
How do bloggers get paid?
How do blogs earn money? How do bloggers get paid? These are the commonly asked questions by newbie bloggers.
1- Google Adsense
2- Affiliate Marketing
3- Sell products or services.
Where can I write my blog?
Well, we have lot of options, let’s see it:
1- WordPress (org)
2- Wix
3- Blogger
4- Medium
5- WordPress (com)
6- Weebly
Is blogging easy?
Just remember one thing, starting a blog is the most easy part.
Thousands of new blogs starts every single day.
Anyone can create a blog in 5 minutes, but very few people will create blogs that matter the most.
So, focus on the quality content.
I hope I was comprehensive enough for you to explain how to start a blog article.
I have explained the most easy way to start a blog.
There is a lot of confusion which is created by these two platforms (org and com).
In my final thoughts, I would blindly say to go for the .org platform, this the best way how to begin a blog with less efforts!
If you are looking on how to make your own blog this article is for you!
You will not regret the decision of choosing wordpress.org ever.
Make sure you do comment and subscribe to us it just motivates us!
Search engine optimization- Module 7
Before we get to know what is search engine optimization and how does it work.
Let us know what is search engines, types of search engines and why search engines are significant for business.
Social media optimization-Module 6
So we are going to start social media optimization from social media fundamentals.
SOCIAL MEDIA FUNDAMENTALS INCLUDE:
What is social media?
Initiation of Google analytics- Module 5
In this fifth module of initiation of google analytics, you will learn all about what is google analytics, how to set up account, the structure of google analytics why to use it, types of google analytics report etc.
Initiation of blogging-Module 4
Before we dive into digital marketing, let us know the meaning of blogging and how to use blogging for your business or as a career. A blog…
Meaning of video marketing- Module 3
Meaning of Graphic Design- Module 2
As we now know what is the meaning of the graphic design, how graphic designing works, the definition of graphic, types of graphic design, elements of graphic…
Introduction of digital marketing- Module 1
We must be aware of the history of digital marketing before diving into digital marketing. Nowadays digital marketing is shining like a crystal with growing opportunities…




Thanks for sharing such a nice thought, paragraph
is pleasant, thats why i have read it entirely
Great delivery. Great arguments. Keep up the great spirit.
Its like you read my mind! You appear to know so
much about this, like you wrote the book in it or something.
I think that you could do with a few pics to
drive the message home a little bit, but other than that, this is great blog.
A great read. I’ll certainly be back.
There’s certainly a lot to find out about this issue.
I like all of the points you have made.
Just wish to say your article is as astounding.
The clearness in your post is simply great and i could assume you’re an expert on this subject.
Fine with your permission let me to grab your RSS feed to keep up to date with
forthcoming post. Thanks a million and please continue the gratifying work.